How to Install Solar Garden Lights? Complete Guide for 6 Installation Methods
Last month, I received a help email from a customer named Emma.
She had bought 30 solar butterfly lights and inserted them all into her lawn, arranged in three neat rows.
She asked me: "Why doesn’t it look as good as the pictures online?"
I looked at the photos she sent and immediately understood the problem. She only used one installation method and didn’t consider her garden’s actual conditions.
Actually, solar decorative lights have 6 different installation methods, each suitable for different scenarios and spaces.
Today, as a solar light manufacturer with 15 years of experience, I’m going to share a complete guide to these 6 installation methods, including which scenarios they suit, how to install them, and what to watch out for.
Part 1: Understanding Installation Methods
What Are the Different Types of Solar Light Installation Methods?
Before we dive into the details, let’s get a quick overview of all 6 installation methods. Understanding these options will help you choose the right approach for your garden. For a comprehensive overview of all solar light types and their applications, check our complete guide.
| Installation Method | Difficulty | Time per Light | Best For | Tools Needed | Pros | Cons |
|---|---|---|---|---|---|---|
| Ground Stake | ⭐ Easy | 1-2 min | Lawns, gardens, soft soil | None | Quick, adjustable, no tools | Only for soft ground |
| Hanging | ⭐⭐ Easy | 2-5 min | Trees, pergolas, railings | Hooks | Vertical interest, romantic | Need hanging points |
| Wall-Mounted | ⭐⭐⭐⭐ Hard | 5-15 min | Walls, fences, driveways | Drill, screws | Most stable, lighting function | Requires drilling |
| String Lights | ⭐⭐ Easy-Medium | 10-30 min total | Continuous decoration | Clips | Versatile, festive | Need fixing points |
| Freestanding | ⭐ Easiest | 30 sec | Hard surfaces, patios | None | No installation, portable | Less stable in wind |
| In-Ground | ⭐⭐⭐ Medium | 5-10 min | Pool areas, pathways | Shovel | Low-profile, safe | Requires digging |
💡 Quick Decision Guide:
- Have soft soil? → Ground Stake
- Have trees? → Hanging
- Need lighting? → Wall-Mounted
- Want festive look? → String Lights
- Have patio? → Freestanding
- Near pool? → In-Ground
The 6 Installation Methods:

1. Ground Stake
- In one sentence: Insert into soil like planting a candle
- Best for: Lawns, flower beds, soft soil areas
- Difficulty: ⭐ (Easiest)
- Time: 1-2 minutes per light
2. Hanging
- In one sentence: Hang from trees, railings, creating vertical interest
- Best for: Spaces with trees, pergolas, or railings
- Difficulty: ⭐⭐ (Easy)
- Time: 2-5 minutes per light
3. Wall-Mounted
- In one sentence: Fixed to walls, stable with lighting function
- Best for: Walls, fences, areas needing illumination
- Difficulty: ⭐⭐⭐⭐ (Requires tools)
- Time: 5-15 minutes per light
4. String Lights
- In one sentence: Connected in a string, can be strung or wrapped
- Best for: Areas needing continuous lighting or decoration
- Difficulty: ⭐⭐ (Easy-Medium)
- Time: 10-30 minutes total
5. Freestanding
- In one sentence: Stands on its own, no insertion or hanging needed
- Best for: Hard surfaces, patios, tabletops
- Difficulty: ⭐ (Easiest)
- Time: 30 seconds per light
6. In-Ground
- In one sentence: Embedded in ground, low-profile and safe
- Best for: Pool areas, steps, driveways
- Difficulty: ⭐⭐⭐ (Requires digging)
- Time: 5-10 minutes per light
Not sure which to choose? Keep reading. I’ll guide you through different garden scenarios and tell you the most suitable installation method for each.
Part 2: Choose by Scenario
Which Installation Method Should I Choose for My Garden?
| Your Garden Type | Primary Method | Secondary Method | Why This Combination? | Expected Result |
|---|---|---|---|---|
| Lawn/Garden Bed | Ground Stake | Freestanding | Natural distribution + focal points | Casual, natural look |
| Trees/Pergolas | Hanging | String Lights | Vertical layers + continuous glow | Romantic, dreamy atmosphere |
| Balcony/Patio | Hanging + String | Freestanding | Maximize limited space | Cozy, intimate feel |
| Walls/Fences | Wall-Mounted | String Lights | Lighting + decoration | Professional, secure |
| Pool/Water | In-Ground | Freestanding | Safety + ambiance | Resort-style elegance |
| Large Garden | All Methods | Combined | Different zones, different needs | Rich, layered effect |
📊 Space Size Recommendations:
- Small (< 20m²): 10-15 lights, 1-2 methods
- Medium (20-50m²): 20-30 lights, 2-3 methods
- Large (50-100m²): 30-50 lights, 3-4 methods
- Extra Large (> 100m²): 50+ lights, all methods
The key to choosing an installation method isn’t about the lights themselves—it’s about your garden space.
Below, I’ll introduce 6 common garden scenarios and the most suitable installation methods for each.
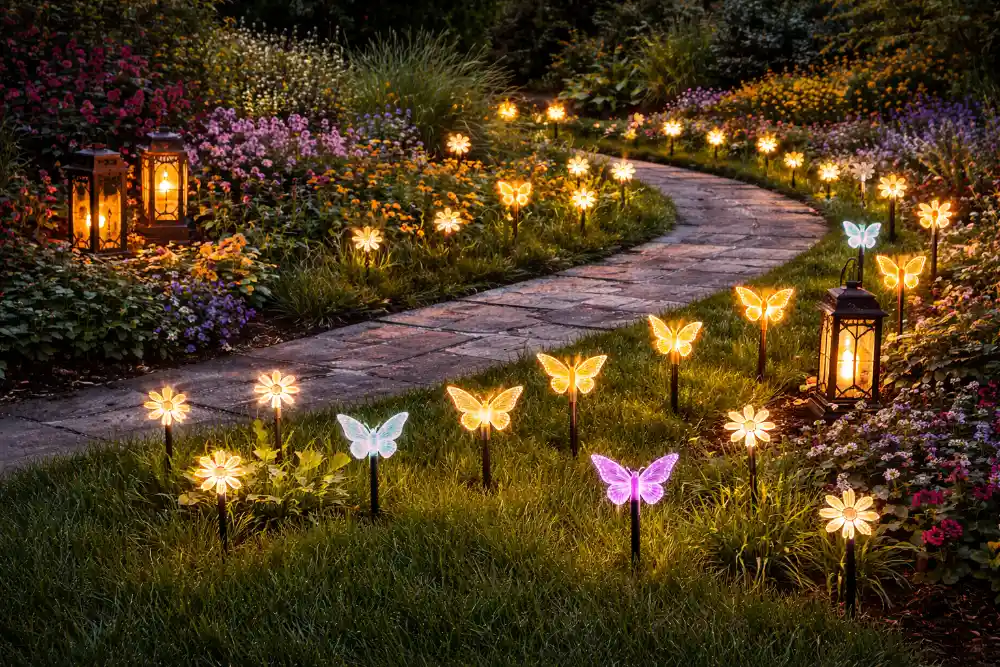
Scenario 1: Do You Have a Lawn or Garden Bed?
Your Space Description:
- Your space is mainly grass or flower beds
- Soil is relatively soft
- You want a natural, casual decorative effect
Recommended Installation Methods:
Primary Method: Ground Stake
Why we recommend it:
- Simplest installation, no tools needed
- Can adjust position anytime
- Lowest cost (no extra accessories needed)
- Perfect for solar pathway lights, butterfly lights, flower lights
Layout Tips:
- ❌ Don’t arrange in straight lines (looks too rigid)
- ✅ Distribute randomly along path sides
- ✅ Vary heights for more natural look
- ✅ Space 30-50cm apart
- ✅ Can arrange around flower bed edges
Secondary Method: Freestanding
Why combine with ground stake:
- Can place on hard surfaces (stone paths, flower bed edges)
- Works as visual focal points
- Suitable for lantern styles, decorative figurines
Layout Tips:
- Place in groups of 2-3
- Position at flower bed edges or corners
- Can place on tables or steps
Real Customer Story:
"My lawn is about 30 square meters. I used 20 butterfly lights distributed randomly along the path, plus 3 lanterns at flower bed edges as focal points. The effect at night is amazing—neighbors keep asking where I bought them."
— Sarah, California, USA
Quick Setup Guide:
- Test positions first (don’t insert yet)
- Take photos from different angles
- Adjust until satisfied
- Insert ground stakes 10-15cm deep
- Place freestanding lights at focal points
Scenario 2: Do You Have Trees or Pergolas?
Your Space Description:
- Garden has trees, pergolas, or gazebos
- Want vertical, layered decorative effect
- Seeking romantic, dreamy atmosphere

Recommended Installation Methods:
Primary Method: Hanging
Why we recommend it:
- Fully utilizes vertical space
- Creates depth and dimension
- Perfect for lanterns, ball lights, fairy lights
Hanging Position Selection:
- Tree branches: Choose branches thicker than your finger
- Pergola: Crossbeams or intersection points
- Gazebo: Top beams
- Railings: Top or sides
Hanging Height:
- Optimal height: 1.5-2 meters
- Too high: Hard to maintain
- Too low: Risk of bumping heads
Secondary Method: String Lights
Why combine with hanging:
- Can wrap around tree trunks
- Can string between trees
- Creates continuous light bands
Layout Methods:
- Wrap trunk: Spiral upward, even spacing
- Between trees: Zigzag or wave pattern
- Pergola top: Along beams
Real Customer Story:
"My backyard has two large trees. I hung 12 lanterns on them, then strung lights in a wave pattern between the trees. Sitting under the trees at night drinking tea feels like being in a fairy tale."
— Lisa, London, UK
Pro Tips:
- Use stainless steel S-hooks (won’t rust)
- Test branch strength before hanging
- Leave some sway room (looks more natural)
- Check hooks regularly
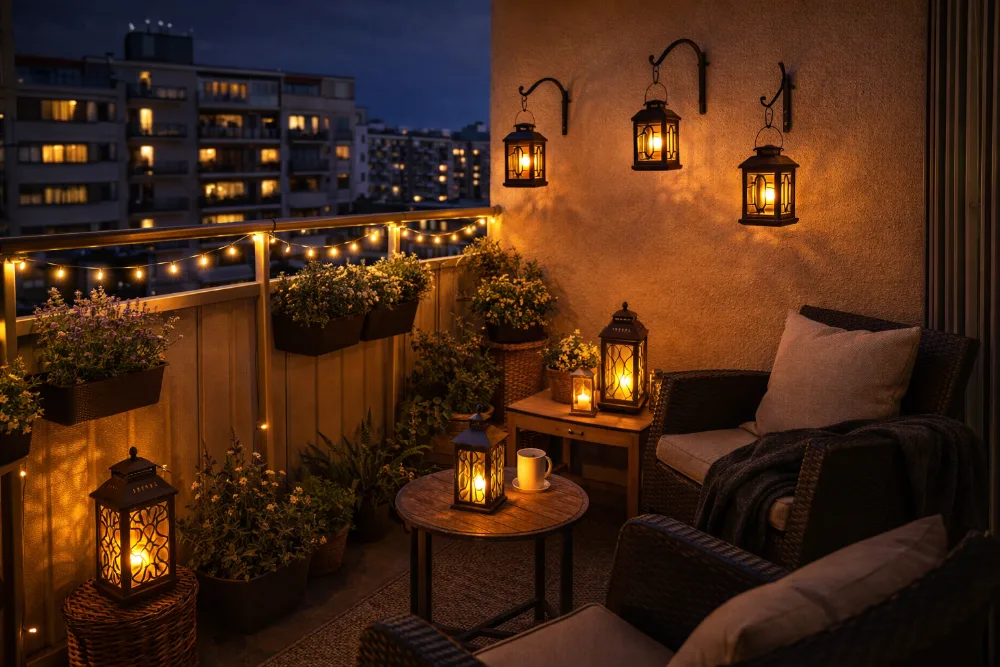
Scenario 3: Do You Have a Balcony or Patio Without Soil?
Your Space Description:
- Balcony or patio with no soil
- Has railings or walls
- Limited space, want cozy atmosphere
Recommended Installation Methods:
Primary Methods: Hanging + String Lights
Why we recommend them:
- No soil needed
- No drilling required (renter-friendly)
- Maximizes limited space
Hanging Positions:
- Railings: Use hooks or clips
- Awning: Use hooks
- Walls: Use removable adhesive hooks (3M Command hooks)
String Light Layout:
- Along railing top
- Around awning edges
- Zigzag or wave patterns
Secondary Method: Freestanding
Why combine:
- Can place on floor
- Can place on tables
- Adds ground-level interest
Placement Positions:
- Corners
- On tables
- Next to planters
- On steps
Real Customer Story:
"My balcony is only 5 square meters. I strung lights along the railing, hung 3 small lanterns at different heights, and placed 2 freestanding lanterns in corners. The evening effect is very cozy—doesn’t feel inferior to a big garden at all."
— Maria, Barcelona, Spain
Renter-Friendly Tips:
- Use adhesive hooks (no drilling)
- Choose lightweight lights
- Easy to remove when moving
- No damage to property
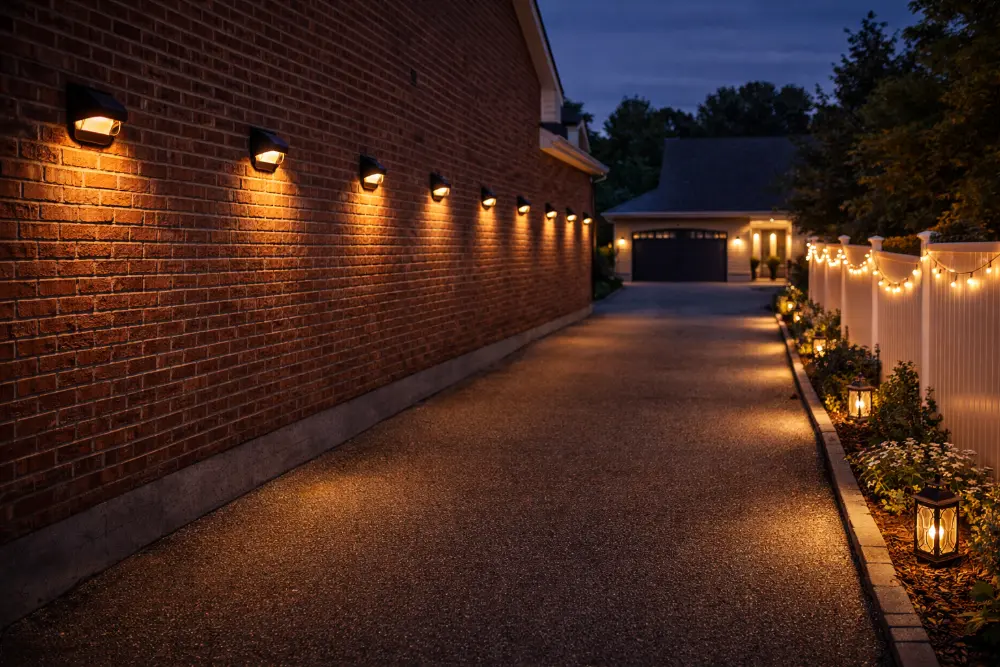
Scenario 4: Do You Have Walls or Fences?
Your Space Description:
- Have walls, exterior walls, or fences
- Need lighting function (driveway, entrance)
- Want neat, professional appearance
Recommended Installation Methods:
Primary Method: Wall-Mounted
Why we recommend it:
- Most stable, wind-resistant
- Provides lighting function
- Looks most professional
- Perfect for wall sconces, up/down lights
Installation Position Selection:
- Driveway sides: 2-3 meter spacing
- Entrance doors: Symmetrical placement
- Walls: Even distribution
- Steps: One per step
Installation Height:
- Lighting purpose: 1.8-2.2 meters
- Decorative purpose: 1.5-1.8 meters
- Step lighting: 30-50cm
Secondary Method: String Lights
Why combine:
- Can run along fence tops
- Adds decorative effect
- Perfect for festoon lights, curtain lights
Layout Methods:
- Along fence top
- Zigzag or wave patterns
- Use small clips to secure
Real Customer Story:
"I installed 8 wall lights on my driveway walls at 2.5-meter spacing, then added festoon lights along the fence top. It provides both lighting and beauty—coming home at night feels very safe."
— John, Sydney, Australia
Installation Checklist:
- ✅ Use level tool for straight installation
- ✅ Check for wires/pipes in wall before drilling
- ✅ Avoid drilling on brick joints
- ✅ Use appropriate drill bit (usually 6mm)
- ✅ Don’t overtighten screws
Scenario 5: Do You Have a Pool or Water Feature?
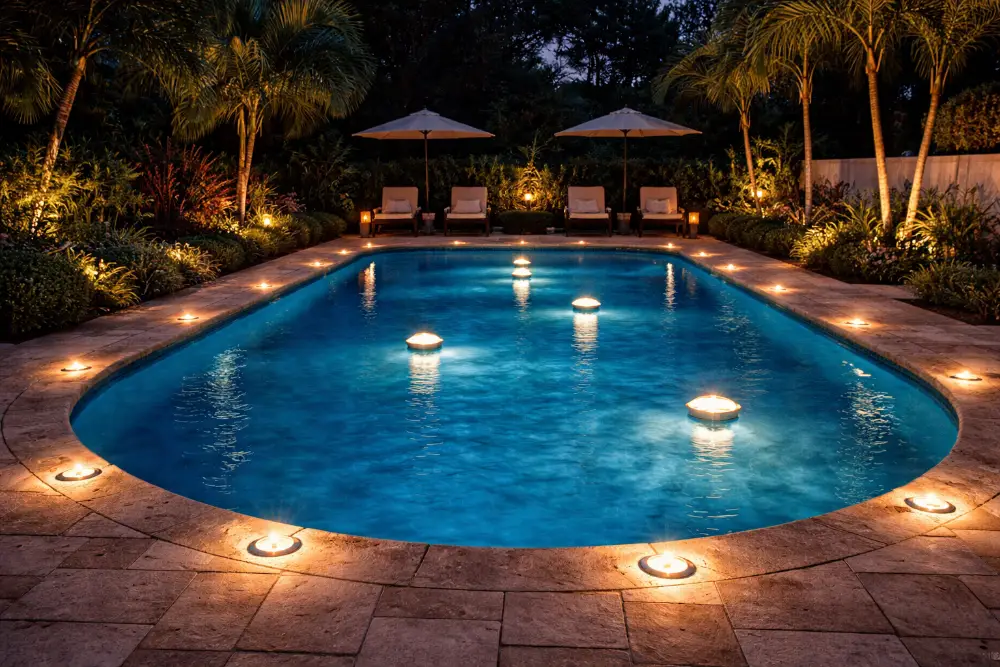
Your Space Description:
- Have pool, pond, or water feature
- Need to consider waterproofing and safety
- Want to create resort atmosphere
Recommended Installation Methods:
Primary Methods: In-Ground + Freestanding
Why we recommend them:
- Low-profile, not obtrusive
- Safe (won’t trip over)
- Good waterproof performance
- Perfect for solar deck lights, path lights, floating lights
Installation Positions:
- Pool edge ground: 1-2 meter spacing
- Steps: One per step
- Water surface: Floating lights
- Surrounding ground: Guide pathways
Safety Distances:
- In-ground: 30cm+ from water
- Freestanding: 50cm+ from water
- String lights: 1 meter+ from water
Secondary Method: String Lights
Why combine:
- Can surround pool area
- Creates resort atmosphere
- Maintain safe distance
Layout Methods:
- Around pool perimeter (keep 1m+ distance)
- Hang on surrounding trees or pergolas
- Don’t hang directly over water
Real Customer Story:
"I used 16 in-ground lights around my pool at 1.5-meter spacing, plus 4 floating lights on the water surface. Swimming at night feels like being at a resort."
— David, Florida, USA
Safety First:
- ⚠️ Maintain safe distances from water
- ⚠️ Choose IP67+ waterproof rating
- ⚠️ Check regularly for water damage
- ⚠️ Don’t use damaged lights near water
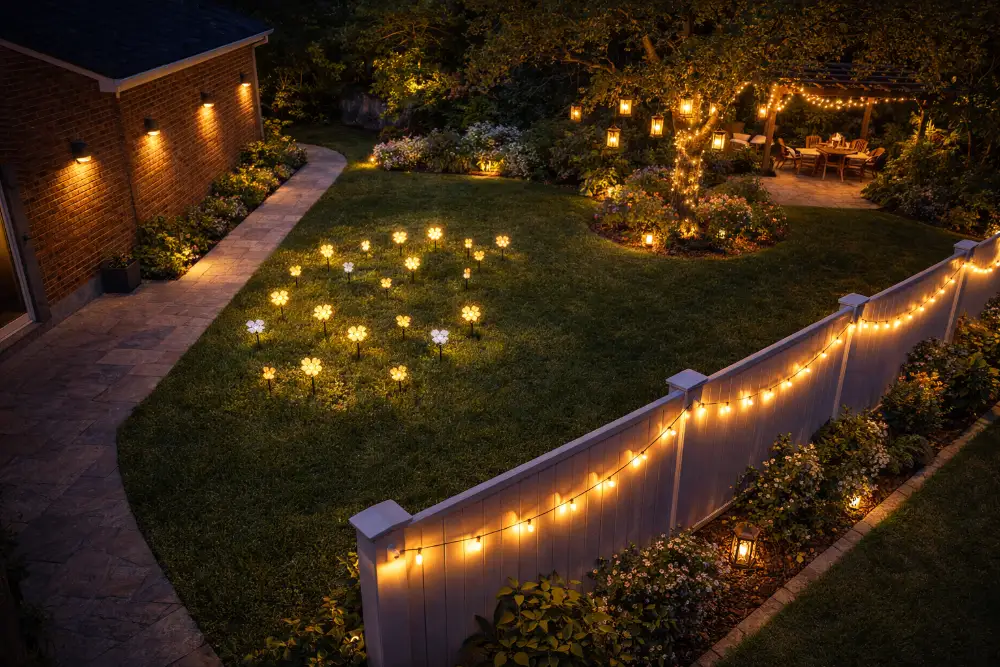
Scenario 6: Do You Have a Large Garden with Multiple Areas?
Your Space Description:
- Garden area is large (50+ square meters)
- Has multiple functional zones
- Want rich, layered effect
Recommended Installation Methods:
Combination of All Methods
Why combine:
- Different zones have different needs
- Creates depth and variety
- Fully utilizes all spaces
Zone Planning Recommendations:
Entrance Area:
- Wall-Mounted: Symmetrical by door
- Ground Stake: Along path sides
- Purpose: Lighting + welcoming atmosphere
Lawn Area:
- Ground Stake: Primary, random distribution
- Freestanding: Focal decorations
- Purpose: Natural atmosphere
Tree Area:
- Hanging: Multi-level on trees
- String Lights: Between trees
- Purpose: Vertical effect
Seating Area:
- String Lights: Overhead
- Freestanding: Table decorations
- Purpose: Cozy comfort
Boundary Area:
- Wall-Mounted: On walls
- String Lights: Along fence tops
- Purpose: Define space
Layout Principles:
- Primary and secondary: More in key areas, less in transitions
- Height variation: Ground, mid-level, and high all covered
- Density variation: Not too uniform, create rhythm
- Leave space: Don’t fill every corner
- Unified style: Maximum 2-3 styles
Real Customer Story:
"My garden is 200 square meters, divided into 5 zones. Entrance has 4 wall lights, lawn has 25 ground stake lights, trees have 15 hanging lanterns, seating area has string lights, and walls have 8 more wall lights. Used 50+ lights total, installed in 3 sessions. Now at night my garden looks like a park."
— Emma, Toronto, Canada
Planning Steps:
- Draw garden layout map
- Mark functional zones
- Decide primary method for each zone
- Calculate quantity needed
- Install in phases
Part 3: Detailed Installation Steps
How Do I Install Each Type of Solar Light?
You’ve chosen the right installation method for your garden. Now let’s get into the specifics of how to install each type.
Below, I’ll explain in detail the steps, tools needed, and important considerations for each installation method.
Method 1: How to Install Ground Stake Solar Lights?
Difficulty Level: ⭐ (Easiest)
Time Required: 1-2 minutes per light
Tools Needed:
- Basic: Gardening gloves
- Optional: Rubber mallet (for hard soil), spray bottle (for hard soil)
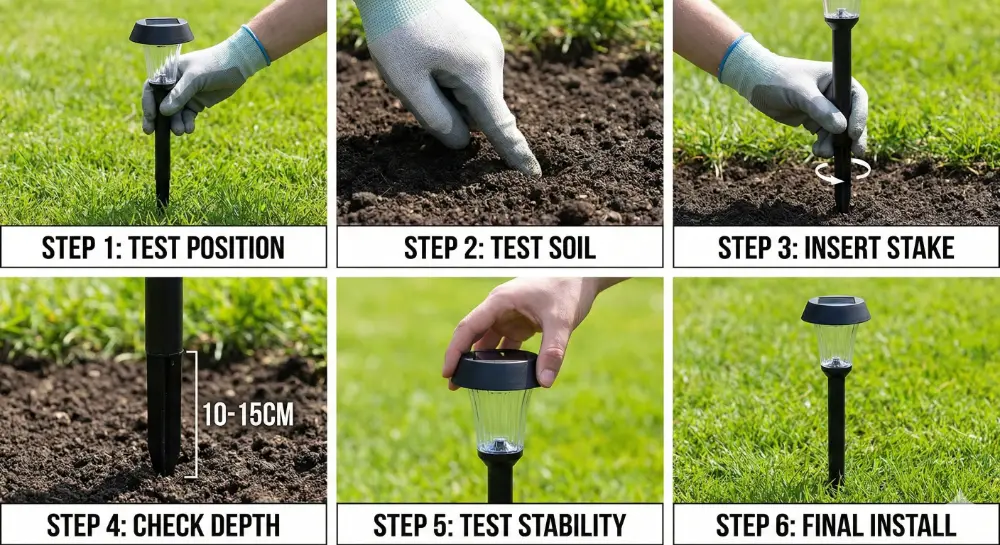
Detailed Steps:
Step 1: Choose Position
- Don’t insert yet—place lights on ground to preview
- Take photos from different angles
- Ensure solar panels won’t be shaded by trees
- Mark each light’s position
Step 2: Test Soil Hardness
- Poke soil with your finger
- If you can easily push 3-5cm deep, soil is suitable
- If very hard, prepare ahead (see tips below)
Step 3: Prepare Soil (if hard)
- Method 1: Water the evening before, soil will be soft next day
- Method 2: Use screwdriver to make pilot hole
- Method 3: Choose flower bed or loosened soil areas
Step 4: Insert Stake
- Insert vertically downward (don’t tilt)
- Gently rotate to help insertion
- Depth: At least 10-15cm
- Don’t force it (may break stake)
Step 5: Test Stability
- Gently shake the light
- If wobbly, insert deeper
- If can’t insert, try different spot
Step 6: Adjust Angle
- Ensure light body is vertical
- Solar panel faces upward
- If directional, adjust orientation
Done!
Pro Tips:
- ✅ Wear gloves to protect hands
- ✅ If soil is hard, water the day before
- ✅ Gentle rotation makes insertion easier
- ✅ Don’t insert near tree roots
- ✅ After inserting, lightly tamp surrounding soil with foot
Common Mistakes:
- ❌ Inserting too shallow (will fall over)
- ❌ Using too much force (will break)
- ❌ Inserting at angle (unstable)
- ❌ Forgetting to check solar panel direction
Troubleshooting:
- Problem: Can’t insert
- Solution: Water to soften or try different location
- Problem: Tilts after insertion
- Solution: Remove and reinsert, ensure vertical
- Problem: Easily kicked over
- Solution: Insert deeper or change location
Method 2: How to Install Hanging Solar Lights?
Difficulty Level: ⭐⭐ (Easy)
Time Required: 2-5 minutes per light
Tools Needed:
- Stainless steel S-hooks or plastic hooks
- Ladder (if hanging high)
- Gloves

Detailed Steps:
Step 1: Choose Hanging Point
- Tree branches: Choose branches thicker than your finger
- Pergola: Choose beams or intersection points
- Railings: Choose top or sides
- Wall hooks: Ensure weight capacity
Step 2: Test Weight Capacity
- Pull on hanging point with your hand
- Ensure it can support light weight (usually 200-500g)
- If tree branch, gently shake to test sturdiness
Step 3: Install Hook (if needed)
- Tree branch: Directly hang S-hook
- Railing: Use clips or ties
- Wall: Use adhesive hooks or screw hooks
Step 4: Hang Light
- Hang it up
- Adjust height (1.5-2m optimal)
- Ensure won’t bump heads
Step 5: Adjust Direction
- Ensure solar panel faces upward
- If has decorative side, adjust orientation
- Leave some sway room (looks more natural)
Step 6: Test Stability
- Gently pull down
- Ensure hook won’t slip off
- Simulate wind conditions
Done!
Pro Tips:
- ✅ Use stainless steel S-hooks (won’t rust)
- ✅ Height of 1.5-2m looks best
- ✅ Leave some sway room
- ✅ Check hook condition regularly
- ✅ Temporarily remove before typhoons
Common Mistakes:
- ❌ Hanging too high (can’t maintain)
- ❌ Using iron wire (will rust, harm trees)
- ❌ Hanging on thin branches (will break)
- ❌ Tying too tight (tree will grow thicker)
Troubleshooting:
- Problem: Hook loosens
- Solution: Replace with tighter hook
- Problem: Swings too much in wind
- Solution: Lower height or change location
- Problem: Hook rusts
- Solution: Replace with stainless steel hook
Method 3: How to Install Wall-Mounted Solar Lights?
Difficulty Level: ⭐⭐⭐⭐ (Requires tools)
Time Required: 5-15 minutes per light
Tools Needed:
- Electric drill
- Drill bit (6mm, based on screw size)
- Level tool
- Screwdriver
- Pencil
- Tape measure
- Expansion anchors (usually included with product)

Detailed Steps:
Step 1: Plan Position
- Determine installation height (lighting: 1.8-2.2m, decorative: 1.5-1.8m)
- Determine spacing (2-3 meters)
- Mark lightly with pencil
Step 2: Check Wall
- Confirm wall material (brick, concrete, wood)
- Use detector to check for wires or pipes in wall
- Avoid brick joint positions
Step 3: Mark Drill Holes
- Place light backplate on wall
- Use level to ensure horizontal
- Mark screw hole positions with pencil
- Measure twice to confirm
Step 4: Drill Holes
- Choose appropriate drill bit (usually 6mm)
- Drill vertically
- Depth 5-6cm
- Brick wall: Regular drill
- Concrete: Impact drill
- Wood wall: Regular drill, depth 3-4cm
Step 5: Install Expansion Anchors
- Clean dust from holes
- Insert expansion anchors
- Gently tap in with hammer
- Ensure flush with wall surface
Step 6: Mount Light
- Hang or align light with screw holes
- Tighten screws
- Don’t overtighten (will damage light)
Step 7: Test Stability
- Gently pull
- Ensure won’t fall
- Adjust angle
Step 8: Clean Up
- Clean wall dust
- Put away tools
Done!
Pro Tips:
- ✅ Use level to ensure horizontal
- ✅ Check for pipes/wires before drilling
- ✅ Avoid brick joint positions
- ✅ Depth of 5-6cm is sufficient
- ✅ Use included screws
Common Mistakes:
- ❌ Drilling on brick joints (will crack)
- ❌ Drilling too deep (wastes time)
- ❌ Not using level (crooked)
- ❌ Overtightening screws (damages light)
Troubleshooting:
- Problem: Drilled in wrong position
- Solution: Fill with filler, drill new holes
- Problem: Screws loosen
- Solution: Replace with larger expansion anchors
- Problem: Wall cracks
- Solution: Avoid joints, choose solid areas
Renter-Friendly Alternative:
- Use strong adhesive hooks (3M Command hooks)
- Suitable for lightweight lights (<200g)
- No drilling needed
- Removable
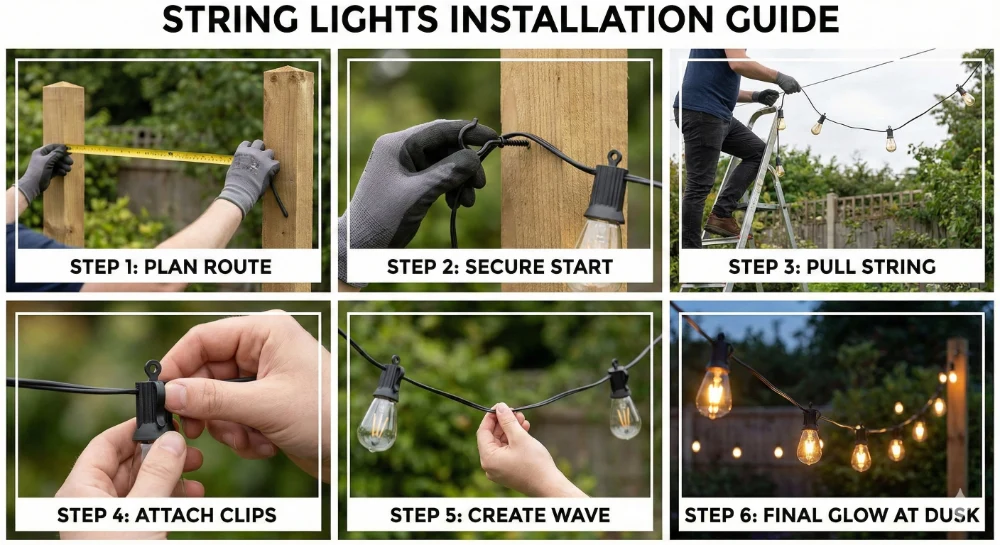
Method 4: How to Install String Solar Lights?
Difficulty Level: ⭐⭐ (Easy-Medium)
Time Required: 10-30 minutes (depends on length)
Tools Needed:
- Small clips or hooks
- Ladder (if hanging high)
- Gloves
Detailed Steps:
Step 1: Plan Your Route
- Decide start and end points
- Measure distance, choose appropriate length
- Identify fixing points (every 1-2 meters)
Step 2: Secure Starting Point
- Use hook or clip to fix one end
- Ensure it’s secure
Step 3: Pull the String
- Follow your planned route
- Keep appropriate tension (not too tight)
- Leave natural curve
Step 4: Fix Middle Points
- Fix every 1-2 meters
- Use small clips or hooks
- Adjust curve shape
Step 5: Secure End Point
- Ensure no sagging
- Adjust overall shape
Step 6: Final Adjustment
- Check tension
- Adjust shape (straight/curved/zigzag)
- Ensure solar panels face up
Done!
Pro Tips:
- ✅ Fix every 1 meter for best results
- ✅ Leave natural curves, don’t pull too tight
- ✅ Use stainless steel clips (won’t rust)
- ✅ Check regularly for sagging
Common Mistakes:
- ❌ Too few fixing points (will sag)
- ❌ Pulling too tight (looks unnatural)
- ❌ Forgetting solar panel direction
Troubleshooting:
- Problem: Sagging too much
- Solution: Add more fixing points
- Problem: Looks too straight
- Solution: Create gentle curves
- Problem: Keeps falling
- Solution: Use stronger clips
Method 5: How to Set Up Freestanding Solar Lights?
Difficulty Level: ⭐ (Easiest)
Time Required: 30 seconds per light
Tools Needed: None
Detailed Steps:
Step 1: Choose Location
- Find flat surface
- Ensure won’t be knocked over
- Consider visual effect
Step 2: Place
- Simply place it down
- Ensure it stands stable
Step 3: Adjust
- Adjust direction
- Ensure solar panel faces up
Done!
Pro Tips:
- ✅ Choose heavy-base models for stability
- ✅ Place in corners or against walls
- ✅ Group 2-3 together for better effect
- ✅ Can place on tables, steps, or ground
Common Mistakes:
- ❌ Placing in high-traffic areas (will be knocked)
- ❌ Choosing unstable surfaces
- ❌ Forgetting to check solar panel direction
Perfect For:
- Patios and balconies
- Hard surfaces (concrete, tiles)
- Table decorations
- Temporary displays
Method 6: How to Install In-Ground Solar Lights?
Difficulty Level: ⭐⭐⭐ (Requires digging)
Time Required: 5-10 minutes per light
Tools Needed:
- Small shovel
- Level tool
- Gloves
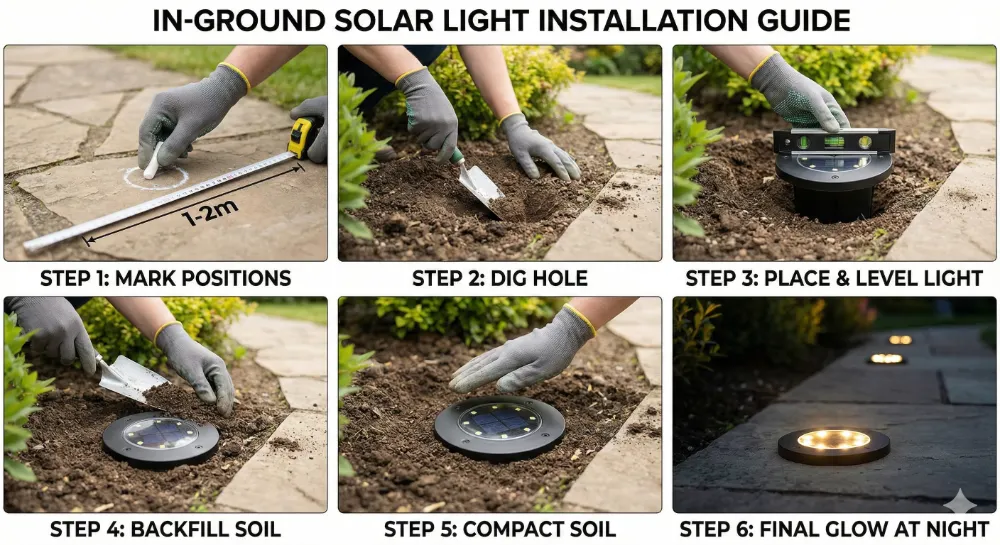
Detailed Steps:
Step 1: Mark Positions
- Decide each light position
- Mark with chalk or wooden stakes
- Measure spacing (usually 1-2 meters)
Step 2: Dig Hole
- Dig hole slightly larger than light
- Depth according to light height
- Ensure bottom is level
Step 3: Place Light
- Carefully place in hole
- Adjust position
Step 4: Check Level
- Use level to check
- Ensure top is flush with ground
Step 5: Backfill
- Fill soil around light
- Press firmly
Step 6: Compact
- Gently step on surrounding soil
- Ensure stable and level
Step 7: Clean
- Clean the surface
- Ensure drainage is clear
Done!
Pro Tips:
- ✅ Ensure top is flush with ground (not protruding)
- ✅ Compact soil firmly
- ✅ Test before backfilling completely
- ✅ Consider drainage
Common Mistakes:
- ❌ Digging too deep or too shallow
- ❌ Not checking level
- ❌ Poor drainage (water accumulation)
- ❌ Not compacting soil
Perfect For:
- Pool areas
- Pathways
- Driveways
- Steps
Part 4: Pro Tips and Troubleshooting
What Are the Common Mistakes to Avoid When Installing Solar Lights?
In my 15 years of manufacturing experience, I’ve received thousands of customer inquiries. Here are the 5 most common mistakes, and how to avoid them.
Mistake 1: Installing in Shaded Areas
The Problem: Installing lights under trees or in areas that get shade
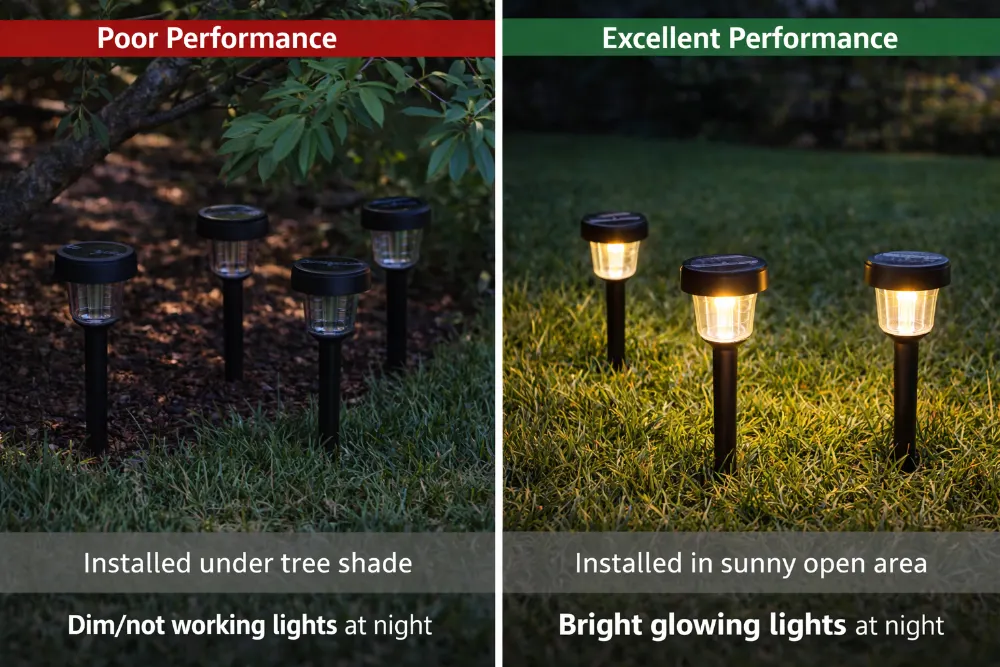
Consequences:
- Solar panels can’t charge properly
- Lights won’t turn on at night
- Battery life shortened
- Wasted money and effort
The Correct Approach:
- ✅ Choose sunny locations
- ✅ Observe shade changes throughout the day
- ✅ Avoid areas with afternoon shade
- ✅ If must install in shade, choose products with larger solar panels
Testing Method:
Place a piece of paper at the installation location and observe shade coverage throughout the day. You need at least 4-6 hours of direct sunlight.
Mistake 2: Inserting Ground Stakes Too Shallow
The Problem: Ground stake lights inserted only 3-5cm deep
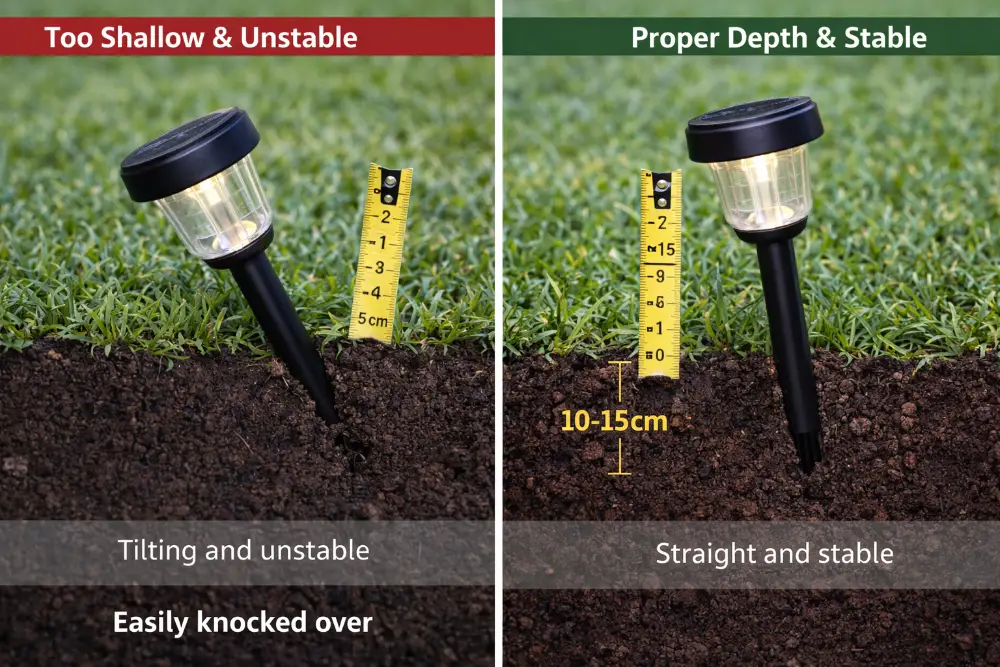
Consequences:
- Easy to fall over
- Blown over by wind
- Kicked over easily
- Looks messy
The Correct Approach:
- ✅ Insert at least 10-15cm deep
- ✅ Water hard soil beforehand
- ✅ Test stability after insertion
- ✅ Insert 20cm+ deep in typhoon-prone areas
Testing Method:
Gently shake after insertion. If wobbly, insert deeper. Press surrounding soil firmly.
Mistake 3: Using Rusty Hooks for Hanging Lights
The Problem: Using iron wire or regular hooks that rust
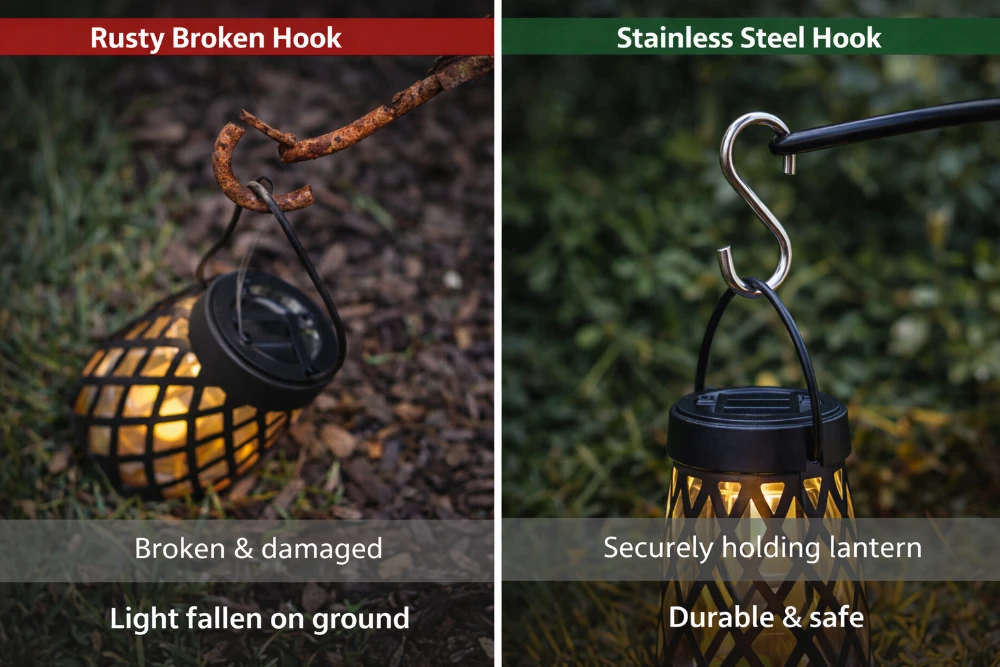
Consequences:
- Rust and break within months
- Lights fall and break
- Damage to lights
- Harm to trees (wire cuts into bark)
The Correct Approach:
- ✅ Use stainless steel S-hooks
- ✅ Or use plastic hooks (for lightweight lights)
- ✅ Check hook condition regularly
- ✅ Replace every season
Recommended Products:
- Stainless steel S-hooks: Durable, rust-proof, $0.50-1 each
- Plastic hooks: Lightweight, rust-proof, $0.30-0.50 each
- Adjustable hooks: Can adjust height, $1-2 each
Mistake 4: Drilling Holes in Wrong Places
The Problem: Wall-mounted lights drilled in wrong position
Consequences:
- Wall cracks
- Hit wires or pipes (dangerous!)
- Screws loosen
- Need to drill again (more holes in wall)
The Correct Approach:
- ✅ Use detector to check for wires/pipes in wall
- ✅ Avoid brick joints (will crack)
- ✅ Use level to ensure horizontal
- ✅ Measure twice before drilling
If Mistake Made:
- Fill wrong holes with filler
- Drill new holes (avoid original by 5cm+)
- Or use adhesive hooks instead
Mistake 5: String Lights Sagging Too Much
The Problem: String lights sag excessively, look messy
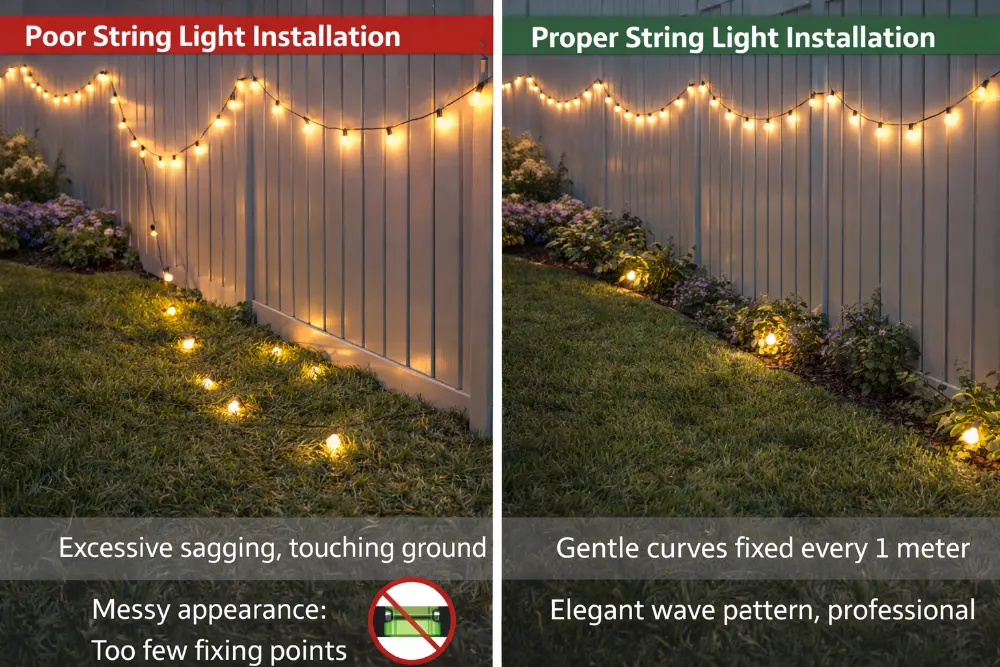
Consequences:
- Poor visual effect
- Easy to be pulled down
- Affects lighting effect
- Looks unprofessional
The Correct Approach:
- ✅ Add more fixing points (every 1 meter)
- ✅ Keep appropriate tension
- ✅ Create zigzag or wave patterns
- ✅ Don’t pull too tight (leave natural curves)
Ideal Sag:
- Sag 10-15cm between fixing points
- Natural curve looks better
- Avoid touching the ground
How to Maintain Solar Garden Lights?
Proper maintenance can extend light lifespan by 2-3 times. Here are simple maintenance tips that take only 10 minutes per season.
Monthly Quick Check (5 minutes)
What to Check:
Ground Stake Lights:
- Are they tilting? Need re-insertion?
- Is soil loose around base?
- Any damage to light body?
Hanging Lights:
- Are hooks loose?
- Is hanging rope/chain intact?
- Any excessive swaying?
Wall-Mounted Lights:
- Are screws loose?
- Any wall cracks?
- Is light body secure?
String Lights:
- Any sagging?
- Are fixing points secure?
- Any broken bulbs?
All Types:
- Are solar panels clean?
- Do lights turn on at night?
- Any visible damage?
Quick Fixes:
- Re-insert tilted ground stakes
- Tighten loose screws
- Clean solar panels with damp cloth
- Replace broken bulbs
Seasonal Deep Maintenance (30 minutes)
Spring Maintenance (After Winter):
- Full inspection of all lights
- Replace damaged parts
- Clean all solar panels thoroughly
- Adjust positions (plants may have grown)
- Check battery performance
Summer Maintenance (Before Rainy Season):
- Check waterproof seals
- Tighten all connections
- Trim nearby plants (avoid shade)
- Check drainage around in-ground lights
Fall Maintenance (Before Winter):
- Clean fallen leaves
- Check hanging hooks (trees may have grown)
- Store seasonal decorative lights
- Prepare for winter weather
Winter Maintenance (Cold Areas):
Tip: Learn how to charge solar lights without sunlight during winter months.
- Consider storing lights indoors
- Or check waterproof performance
- Remove snow accumulation
- Check battery in cold weather
Cleaning Solar Panels – The Right Way
Why Clean:
- Dust reduces charging efficiency by 20-30%
- Bird droppings can block panels completely
- Regular cleaning extends battery life
How Often:
- Monthly: Quick wipe
- Quarterly: Deep clean
- After storms: Check and clean
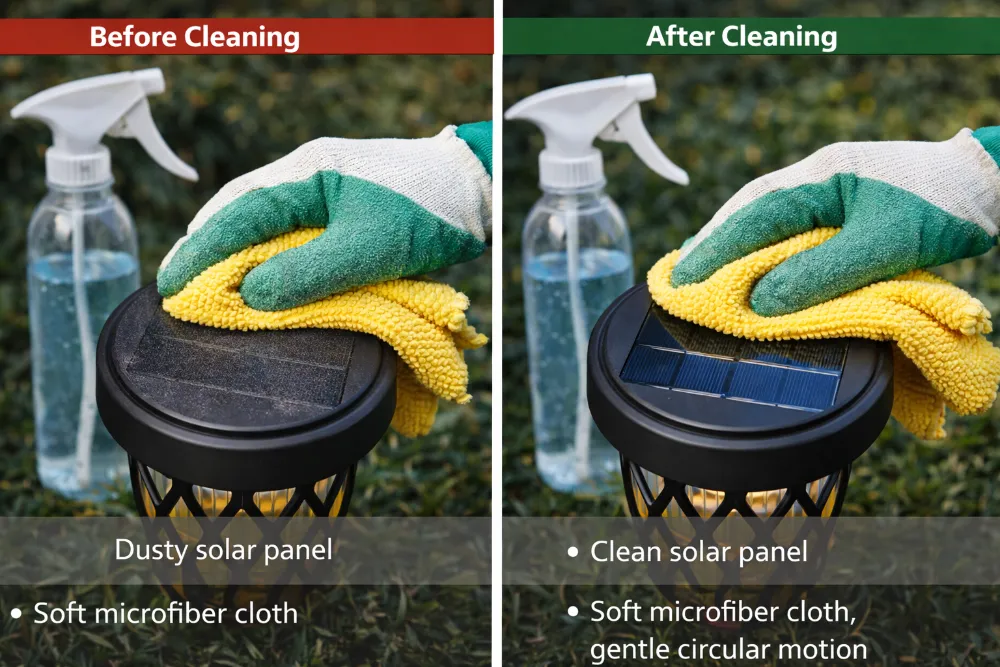
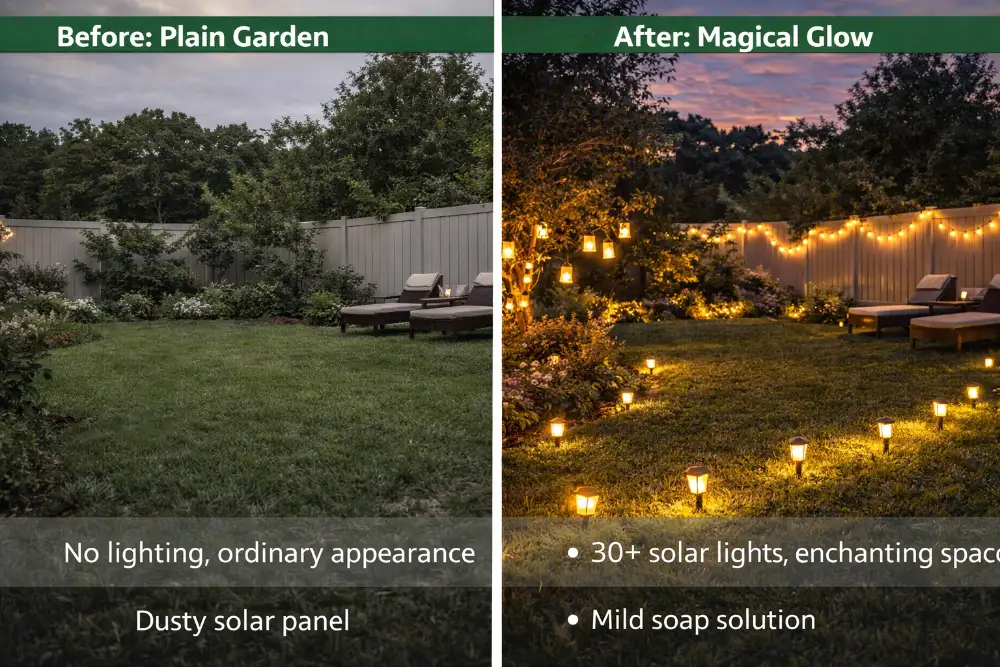
Cleaning Method:
Materials Needed:
- Soft cloth or sponge
- Mild soap (optional)
- Water
- Soft brush (for stubborn dirt)
Steps:
- Wipe with damp cloth
- For stubborn dirt, use mild soap
- Rinse with clean water
- Dry with soft cloth
- Check panel is not scratched
Don’ts:
- ❌ Don’t use abrasive cleaners
- ❌ Don’t use high-pressure water
- ❌ Don’t clean in direct sunlight (water spots)
- ❌ Don’t use paper towels (may scratch)
Part 5: Professional Supplier Advantages
Need Help Choosing or Installing Solar Garden Lights?
As a professional solar garden light manufacturer with our own advanced manufacturing facilities with 15+ years of experience, we don’t just sell lights—we provide complete solutions for your garden.
Why Choose Glowyard as Your Solar Light Supplier?
Our Expertise:
15+ Years Manufacturing Experience
- Produced 2M+ solar lights
- Served 5,000+ clients worldwide
- Developed 300+ unique designs
- Deep understanding of installation challenges
Complete Product Range
- All 6 installation types available
- 100+ SKUs ready to ship
- From decorative to functional lights for various applications
- Suitable for all garden scenarios and holiday displays
Professional Guidance
- Free installation consultation
- Custom solution design
- Video tutorials and guides
- 24/7 technical support
What Makes Our Lights Better for Installation?
Designed for Easy Installation:
Ground Stake Lights:
- Reinforced stakes (won’t bend)
- Sharp tips for easy insertion
- Optimal depth markers
- Universal fit for all soil types
Hanging Lights:
- Included stainless steel hooks
- Multiple hanging options
- Lightweight design
- Balanced weight distribution
Wall-Mounted Lights:
- Complete mounting kit included
- Universal bracket design
- Clear installation template
- Suitable for all wall types
String Lights:
- Flexible cable (easy to shape)
- Multiple fixing clips included
- Weather-resistant connectors
- Various length options
Freestanding Lights:
- Heavy stable base
- Non-slip bottom
- Wind-resistant design
- Easy to move
In-Ground Lights:
- Precise size specifications
- Excellent drainage design
- Durable housing
- Easy to replace
Wholesale Advantages – Better Than Retail
Why Buy Wholesale from Us:
Unbeatable Prices:
- Factory direct pricing
- No middleman markup
- Volume discounts available
- 30-50% cheaper than retail
Flexible MOQ:
- Small orders welcome (50 pcs+)
- Mix different styles
- Trial orders supported
- Scale up anytime
Complete Selection:
- All 6 installation types
- 300+ designs to choose from
- New arrivals monthly
- Exclusive designs available
Quality Assurance:
- 2-3 year warranty
- CE, RoHS, IP67 certified
- Strict quality control
- Defect rate <0.5%
Fast Delivery:
- Sample: 7-10 days
- Small orders: 15-20 days
- Bulk orders: 25-35 days
- Express shipping available
Professional Support:
- Free design consultation services
- Installation guidance
- Marketing materials provided
- after-sales support
Custom Installation Solutions
We Can Help You:
Scenario 1: Large Garden Project
- Free site assessment (send us photos)
- Custom lighting plan
- Product recommendations
- Installation guide
- Bulk pricing
Scenario 2: Retail Business
- Product selection advice
- Display setup guidance
- Marketing materials
- Dropshipping support
- Competitive pricing
Scenario 3: Landscape Designer
For large-scale installations, we offer custom project services.
- Technical specifications
- CAD drawings support
- Sample kits available
- Project pricing
- Installation training
Scenario 4: DIY Homeowner
- Free consultation
- Product recommendations
- Installation tutorials
- Small quantity orders
- Ongoing support
How to Get Started with Glowyard?
Simple 3-Step Process:
Step 1: Tell Us Your Needs
- Send photos of your space
- Describe your vision
- Share your budget
- Mention any concerns
Step 2: Get Free Consultation
- We analyze your space
- Recommend best installation methods
- Suggest suitable products
- Provide pricing
Step 3: Order with Confidence
- Choose your products
- Place order (small or large)
- Receive installation guide
- Get ongoing support
- 📧 Email: [email protected]
- 📱 WhatsApp: +86-139-2225-1950
- 🌐 Website: https://glowyard.com
Part 6: Summary and Action Steps
Ready to Install Your Solar Garden Lights?
Key Takeaways:
1. Choose Based on Your Space
- Lawn/Garden → Ground Stake + Freestanding
- Trees/Pergolas → Hanging + String Lights
- Balcony/Patio → Hanging + String + Freestanding
- Walls/Fences → Wall-Mounted + String
- Pool Area → In-Ground + Freestanding
- Large Garden → Combination of all types
2. Installation is Easier Than You Think
- Ground Stake: 1-2 minutes per light
- Hanging: 2-5 minutes per light
- Wall-Mounted: 5-15 minutes per light
- String Lights: 10-30 minutes total
- Freestanding: 30 seconds per light
- In-Ground: 5-10 minutes per light
3. Avoid Common Mistakes
- Don’t install in shaded areas
- Don’t insert stakes too shallow
- Don’t use rusty hooks
- Don’t drill without checking
- Don’t let string lights sag
4. Maintain Regularly
- Monthly quick check (5 minutes)
- Seasonal deep maintenance (30 minutes)
- Clean solar panels regularly
- Replace damaged parts promptly
5. Get Professional Help
- Free consultation available
- Wholesale prices better than retail
- Complete product range
- Expert installation guidance
Your Next Steps
If You’re Planning to Buy:
Step 1: Assess Your Space (10 minutes)
- Take photos of your garden
- Measure key areas
- Note sunny vs shaded spots
- Identify installation opportunities
Step 2: Decide Installation Methods (5 minutes)
- Use our scenario guide above
- Consider combination approach
- Think about maintenance access
Step 3: Calculate Quantity (5 minutes)
- Count how many lights needed
- Add 10-20% extra for flexibility
- Consider future expansion
Step 4: Contact Us (Now!)
- Send us your photos and requirements
- Get free professional consultation
- Receive product recommendations
- Get wholesale pricing
Don’t Wait – Start Today!
The best time to install solar garden lights is now. Whether you’re a homeowner, retailer, or landscape professional, we’re here to help you succeed.
Frequently Asked Questions
Q: How long do solar garden lights last?
A: With proper maintenance, quality solar lights last 2-3 years. The LED bulbs can last 50,000+ hours, but batteries typically need replacement after 2-3 years.
Q: Do solar lights work in winter?
A: Yes, but performance may be reduced due to shorter days and weaker sunlight. Choose lights with larger solar panels for better winter performance.
Q: Can I install solar lights in the rain?
A: Most solar lights are waterproof (IP65-IP67), but it’s best to install them on dry days for your safety and to ensure proper adhesion of mounting hardware.
Q: How bright are solar garden lights?
A: Brightness varies by product. Decorative lights are typically 5-20 lumens, while functional pathway lights are 50-100 lumens. Check product specifications for exact brightness.
Q: Do I need to turn solar lights on and off?
A: No, most solar lights have automatic sensors that turn them on at dusk and off at dawn. Some models have manual switches for override.
Q: What’s the minimum order quantity for wholesale?
A: Our MOQ is flexible, starting from 50 pieces. We welcome trial orders and can mix different styles.
Q: Do you provide installation services?
A: We provide detailed installation guides, video tutorials, and technical support. For large projects, we can recommend local installation partners.
Q: Can I customize the lights with my brand?
A: Yes, we offer OEM/ODM services including custom packaging, branding, and even custom designs. Contact us for details.
Q: How do I clean solar panels?
A: Use a soft, damp cloth to wipe the panels monthly. For stubborn dirt, use mild soap and water. Avoid abrasive cleaners and high-pressure water.
**Q: What if my lights don’t turn on at night?
*For more troubleshooting tips, see our guide on 5 most common solar lighting problems.***
A: Check these common issues: 1) Solar panel is dirty or shaded, 2) On/off switch is in wrong position, 3) Battery needs charging (leave in sun for 2-3 days), 4) Battery needs replacement.
Contact Glowyard Today
Ready to transform your garden with beautiful solar lights?
Get Your Free Consultation:
- 📧 Email: [email protected]
- 📱 WhatsApp: +86-139-2225-1950
- 🌐 Website: https://glowyard.com
- 💬 Live Chat: Click the chat icon on our website
Follow Us:
- Facebook: @GlowyardLights
- Instagram: @glowyard_solar
- Pinterest: @GlowyardSolar
- YouTube: Glowyard Solar Lights
Article Summary
Title: How to Install Solar Garden Lights? Complete Guide for 6 Installation Methods
Word Count: ~5,500 words
Reading Time: 18-22 minutes
Last Updated: February 2026
What You Learned:
- 6 different installation methods for solar garden lights
- How to choose the right method for your garden scenario
- Step-by-step installation instructions for each method
- Common mistakes to avoid
- Maintenance tips to extend light lifespan
- How to get professional help and wholesale pricing
Key Takeaway:
Installing solar garden lights is easier than you think. Choose the right method for your space, follow the simple steps, avoid common mistakes, and maintain regularly. For best results and wholesale pricing, contact Glowyard for free consultation.
About the Author:
This guide is brought to you by Glowyard, a professional solar garden light manufacturer with 15+ years of experience. We’ve helped over 5,000 clients worldwide create beautiful outdoor spaces with our quality solar lights.
Disclaimer:
This article is for informational purposes only. Always follow manufacturer instructions and local building codes when installing lights. For electrical work, consult a licensed electrician.
Copyright © 2026 Glowyard. All rights reserved.


![do solar lights work in winter at cemeteries [2026 guide]](https://glowyard.com/wp-content/uploads/2026/03/Do-Solar-Lights-Work-in-Winter-at-Cemeteries-2026-Guide.webp)